
Example patient: try Harmy without a patient in front of you

Making your first projection with a patient sitting in front of you is not the best moment to learn the app. That is why Harmy offers an example patient: a fictional person, with the photo ready and two areas already marked. In a few taps you see the whole flow, from marking to Before / After, before using the app in a consultation.
What is the example patient?
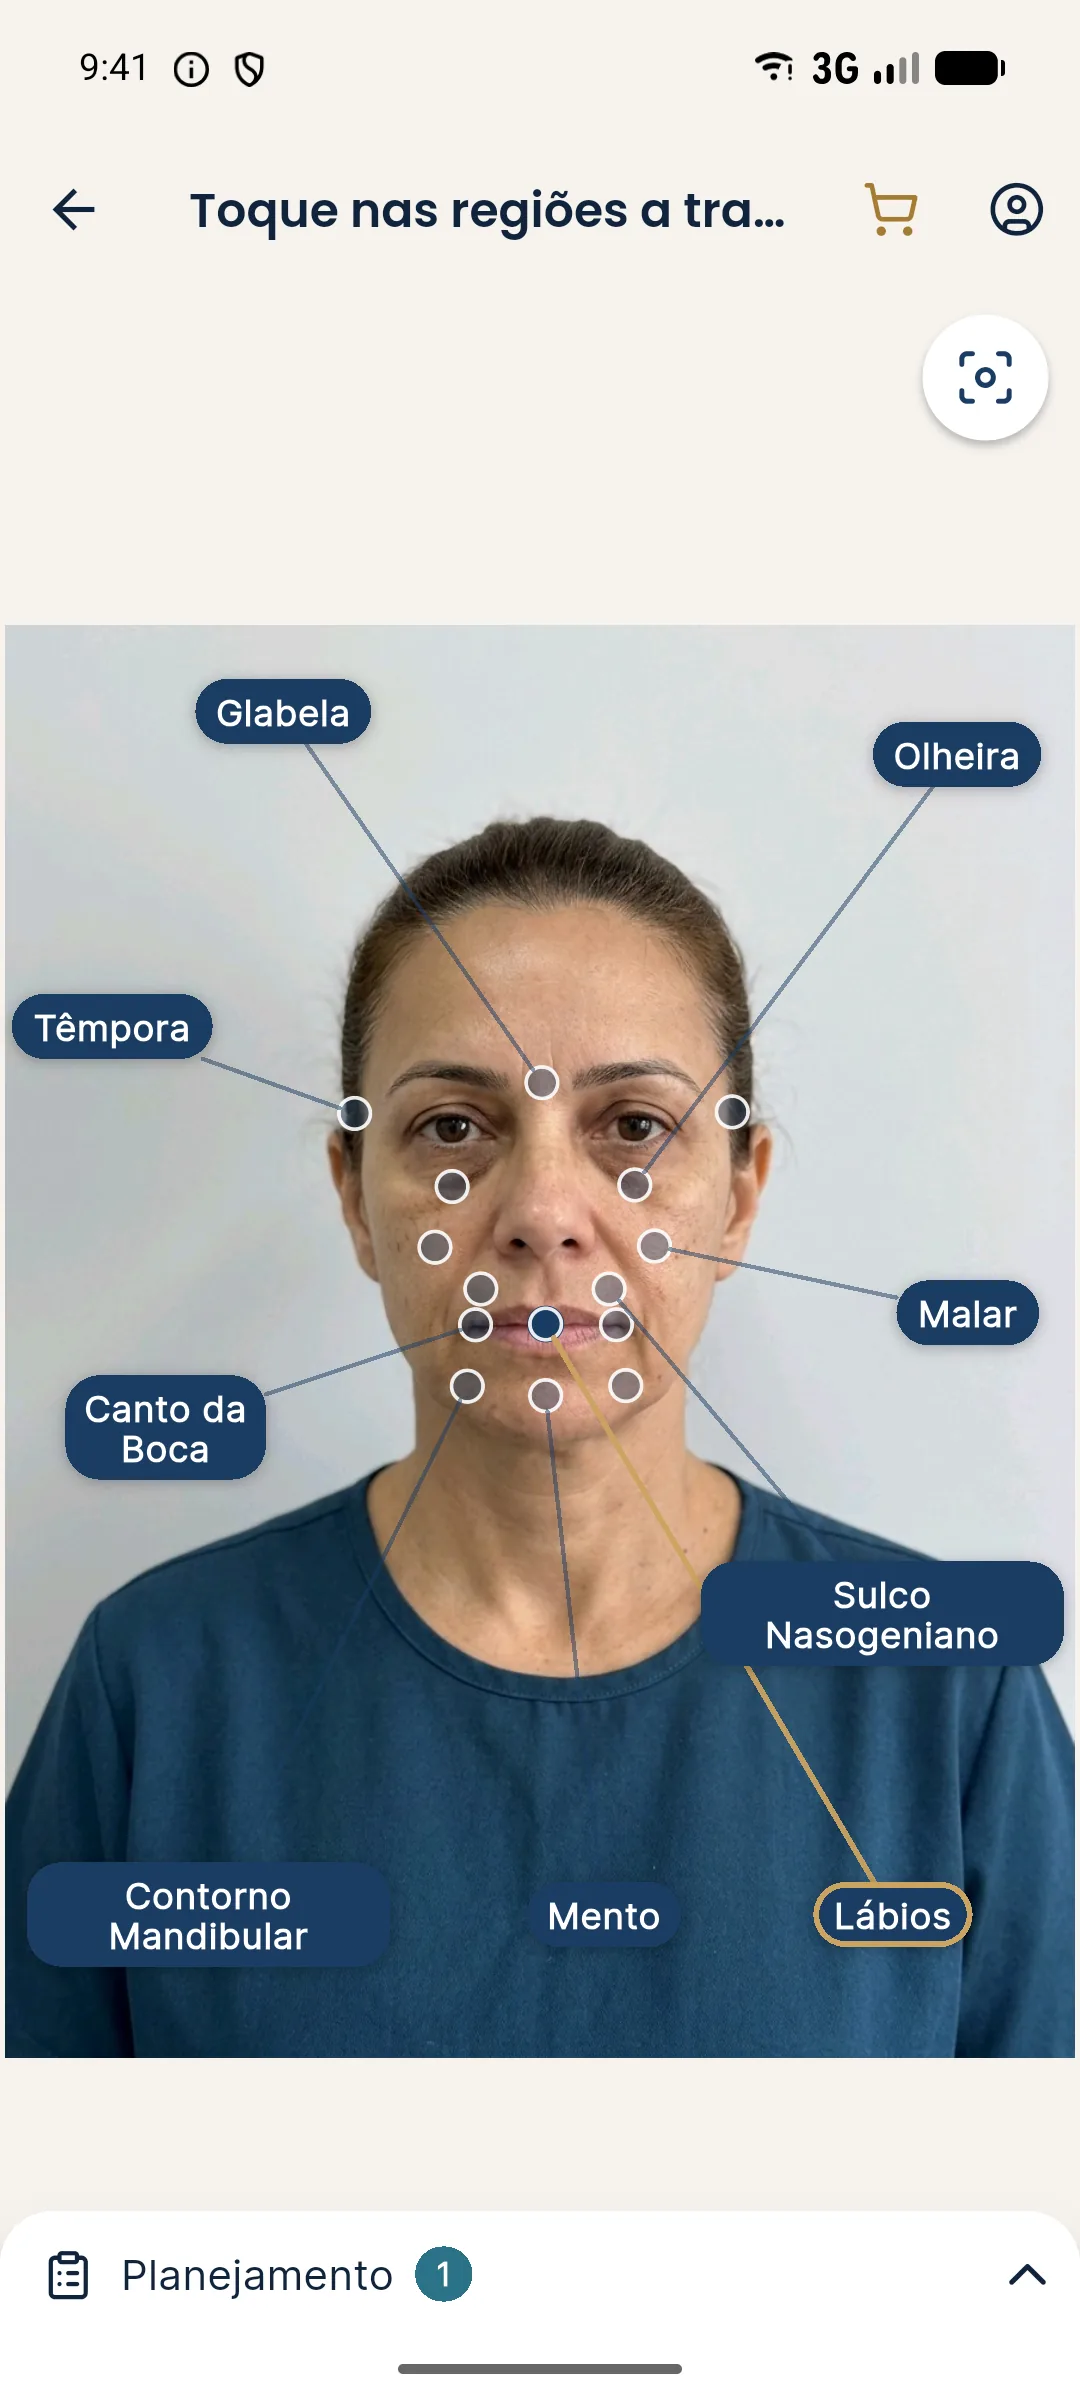
It is a frontal photo of a fictional person that already comes inside the app. It was chosen to show the difference between the before and the projection well. When you open the test, the app skips the name and photo steps and goes straight to the marking screen, with Tear Trough and Lips selected at 1 ml each.
The result is a real projection: the photo goes to the AI, which generates the after image under the same rules as any session. The change is limited to the marked areas and proportional to the volume, as an illustrative simulation.
Who sees the test option?
The option appears only for accounts that have not yet made any projection. It sits on the New patient screen, in a box titled No patient right now?. As soon as the account has a projection, with a real or example patient, the box disappears and does not return.
Step by step
- On the home screen, tap New projection.
- On the New patient screen, look for the No patient right now? box, below the name field. The text explains that the photo comes ready, with Tear Trough and Lips marked, and that the session stays in the history under the name Test.
- Tap Try with a fictional patient. The marking screen opens with the fictional person's photo and the notice Sample photo: fictional person in the top corner.
- The first time, the app shows a short tip about the test. Read it and close it.
- If you like, tap other areas to include them and adjust the volumes in the Plan, in steps of 0.5 ml. You can also unmark Tear Trough or Lips by tapping the point again. The details are in marking areas and volumes.
- Tap Create projection. The app warns that the photo will be sent to a third-party AI to generate the image.
- When it finishes, the Before / After screen opens. Drag the gold line to compare and use two fingers to zoom in.
- When you are ready to see patients, tap Try it with a real patient, below the image. The app returns to the New patient screen.
How much does the test cost?
The test uses credit like any projection: R$ 3.99 of the balance. A new account gets 1 welcome projection, which covers exactly this test. If you already used the welcome projection in another session, the test box does not even appear, because the account already has a projection. More details in credits and top-up.
Where does the example session go?
The session goes to the History under the name Test and with an Sample badge over the photo, so it is not confused with a real patient. You can reopen it at any time and show the Before / After.
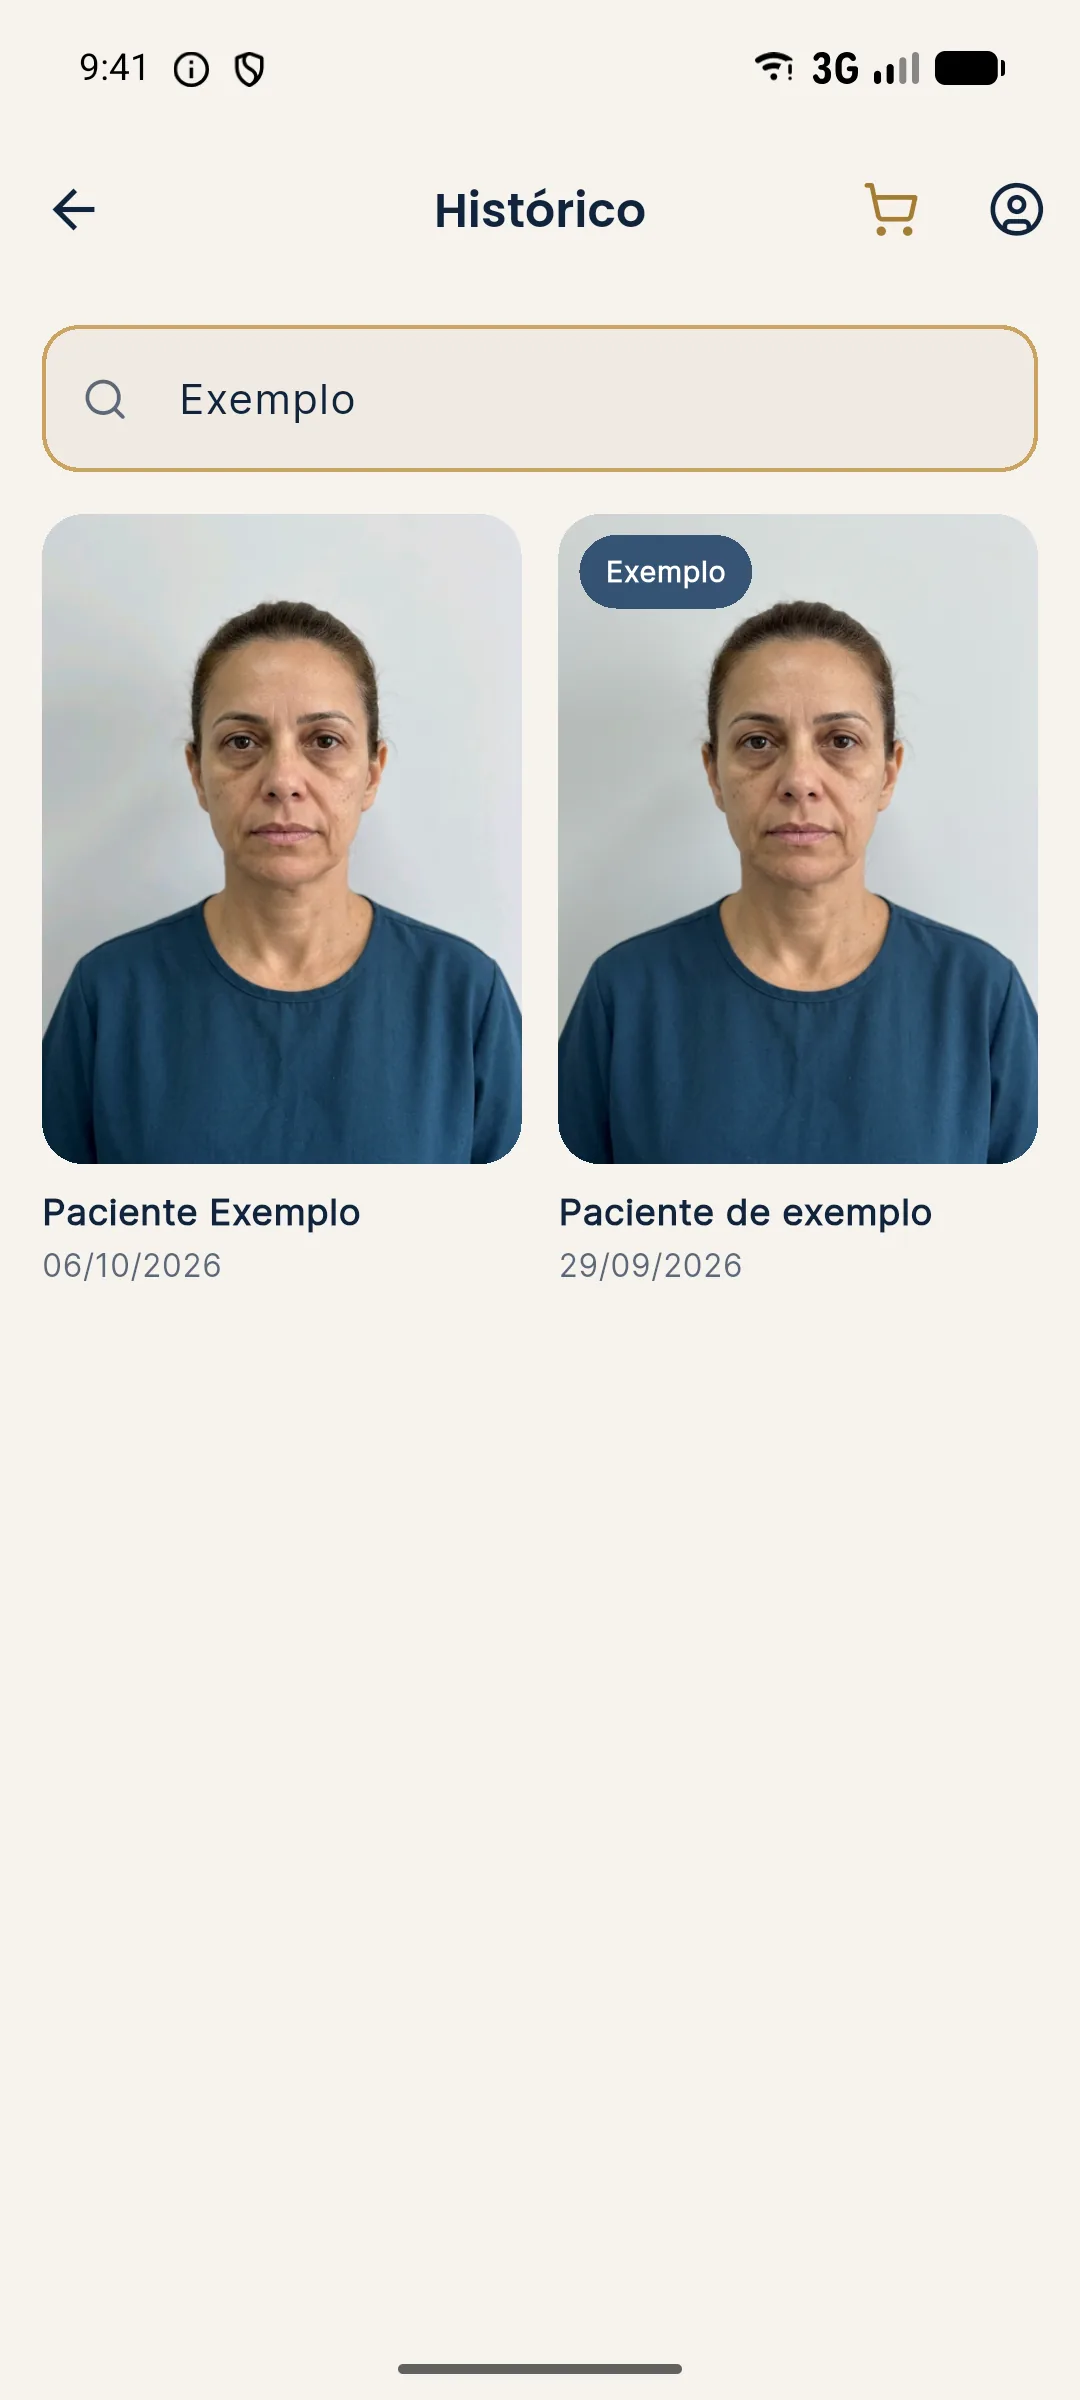
The example session does not accept Add actual result, because there is no treated patient. See how that step works with real patients in history and actual result.
What is the test good for?
- Learning the flow without pressure. You understand marking, the Plan and the slider before the consultation.
- Seeing how the AI handles volume. Compare the effect of 1 ml with that of a larger volume and see why Harmy's changes tend to be subtle.
- Practicing the presentation. Rehearse how to show the Before / After and how to explain that the image is a simulation, not a promise of results. The guide presenting before and after in the consultation helps.
- Showing the app to your team. The person is fictional, so you can use the session to explain the app to the front desk or another professional.
Common mistakes and how to fix them
| Situation | What to do |
|---|---|
| The No patient right now? box does not appear | The account already has a projection. Make the next one with a real patient, following new projection. |
| "Could not open the test" | Tap Try with a fictional patient again. If it persists, close and reopen the app. |
| "Not enough credits" | The balance does not cover the projection. Top up and return to Create projection: your marking stays saved. |
| I used the example photo in advertising | Do not use it. The image is for testing and does not represent a patient of yours. See what you may advertise (in Brazil, under the CFO and CONAR rules). |
Next step
With the test done, prepare the photo of your first real patient. The tutorial standardized frontal photo shows how to make an image that the marking screen recognizes well.
Frequently asked questions
Is Harmy's example patient a real person?
No. The photo is of a fictional person, created for testing. On the marking screen, the notice "Sample photo: fictional person" appears in the corner of the image.
Does the projection with the example patient use credit?
Yes. It is a regular projection, generated by the AI, and it uses credit like any other. A new account gets 1 welcome projection, which covers this test.
Why don't I see the No patient right now? option?
The box appears only for accounts that have not yet made any projection. After the first projection, with a real or example patient, it stops appearing.
Can I add an actual result to the example session?
No. The example session stays in the history for reference, but it does not accept an actual-result photo, since there is no treated patient.