
Facial assessment by photo: what to look for in the analysis
The photo is one of the most useful tools in facial assessment for orofacial harmonization (HOF): it lets you look at the face calmly, compare sides, measure proportions and show the patient what you see. It is also one of the most misleading, because it squeezes a three-dimensional, moving object into a flat image taken with one expression, one lens and one light. Knowing what to look for, and what not to conclude, is part of good analysis.
This guide teaches an organized reading of the frontal photo, points out the checkpoints for each area and shows when the image deceives. It is not a treatment protocol: it is an observation guide, at the discretion of the qualified professional, after an in-person assessment. For the basics of standardization, see standardized clinical photography and facial assessment by thirds.
What does the photo show well, and what does it not show?
| The photo shows well | The photo shows poorly |
|---|---|
| Overall symmetry at rest | Volume and projection (depth) |
| Proportions between thirds | Skin texture and quality |
| Expression lines frozen at the moment | Movement dynamics |
| Contour and reference lines | Laxity to the touch, elasticity |
| Comparison between standardized photos | History, habits and concerns |
In short: the photo supports the conversation, but it does not decide the plan. The decision comes from the whole picture of history, exam, palpation, movement and the patient's expectations.
How do you prepare the photo before analyzing it?
The quality of the analysis depends on the quality of the image. Before interpreting, check:
If the photo is crooked, poorly lit or filtered, retake it before interpreting. An analysis of a bad image is worse than none. In Harmy, the standardized frontal photo follows the same logic.
In what order should you read the face?
An order helps you avoid getting lost and avoid "hunting" for flaws. A suggestion:
- Overview: look at the whole face for a few seconds before measuring anything. What catches your eye first? It is what the patient sees too.
- Symmetry: compare the right and left sides. Every face has natural asymmetry. What matters is what bothers the patient and what is clinically relevant. See facial asymmetry and explaining natural asymmetry to the patient.
- Thirds: observe the proportions between the upper, middle and lower thirds. See facial assessment by thirds.
- Area by area: eyes and under-eye area, cheekbone, nasolabial fold, lips, chin and jaw.
- Contour: the line that joins the cheekbone, jaw and chin.
- Skin: tone, shine and texture as far as the photo lets you see, remembering that light distorts.
What should you look for in each area?
Always as an observation reading, not as a procedure indication:
| Area | What to look for in the photo |
|---|---|
| Upper third | Static expression lines, eyebrow height and symmetry, glabella |
| Eyes and tear trough | Shadow under the eye, groove, relationship with the cheekbone |
| Cheekbone | Projection, shadow under the apple of the cheek, transition to the midface |
| Nasolabial fold | Depth, symmetry, relationship with the upper lip |
| Lips | Proportion between upper and lower, contour, symmetry of the arch |
| Mouth corners | Slope, shadow, relationship with the smile at rest |
| Chin | Projection and symmetry of the chin |
| Jawline | Definition, angle and continuity of the line |
Each point has a matching area in areas. For the main ones, see tear trough, cheekbone, lips and jawline.
When does the photo mislead?
This is the most important part. Some factors change what seems to exist:
- Lens and distance: a photo taken too close widens the center of the face and narrows the sides.
- Angle: a camera above or below eye level changes how the chin, nose and eyes read.
- Light: shadow from above accentuates under-eye hollows and folds; very strong frontal light flattens the face.
- Expression: a slight smile changes the lips, cheekbones and folds.
- Makeup and filters: they hide or accentuate what you want to assess.
- Head posture: tilting the chin up or down changes the profile of the jaw.
How do you use the photo to talk with the patient?
The photo is a good communication tool when used with tact. First ask what the patient sees, then show what you observe. Avoid starting by listing flaws.
It is also worth recording what the patient said in their own words. See recording concerns in the patient's own words and how to use the frontal photo in the conversation.
How does Harmy fit into photo analysis?
Harmy starts from a frontal photo. The app detects the face on the device and shows labeled points (Glabella, Temple, Tear Trough, Cheekbone, Nasolabial Fold, Mouth Corner, Lips, Chin and Jawline). You tap the points for the areas to be treated, set the ml and create the projection, which appears in Before and After on the slider.
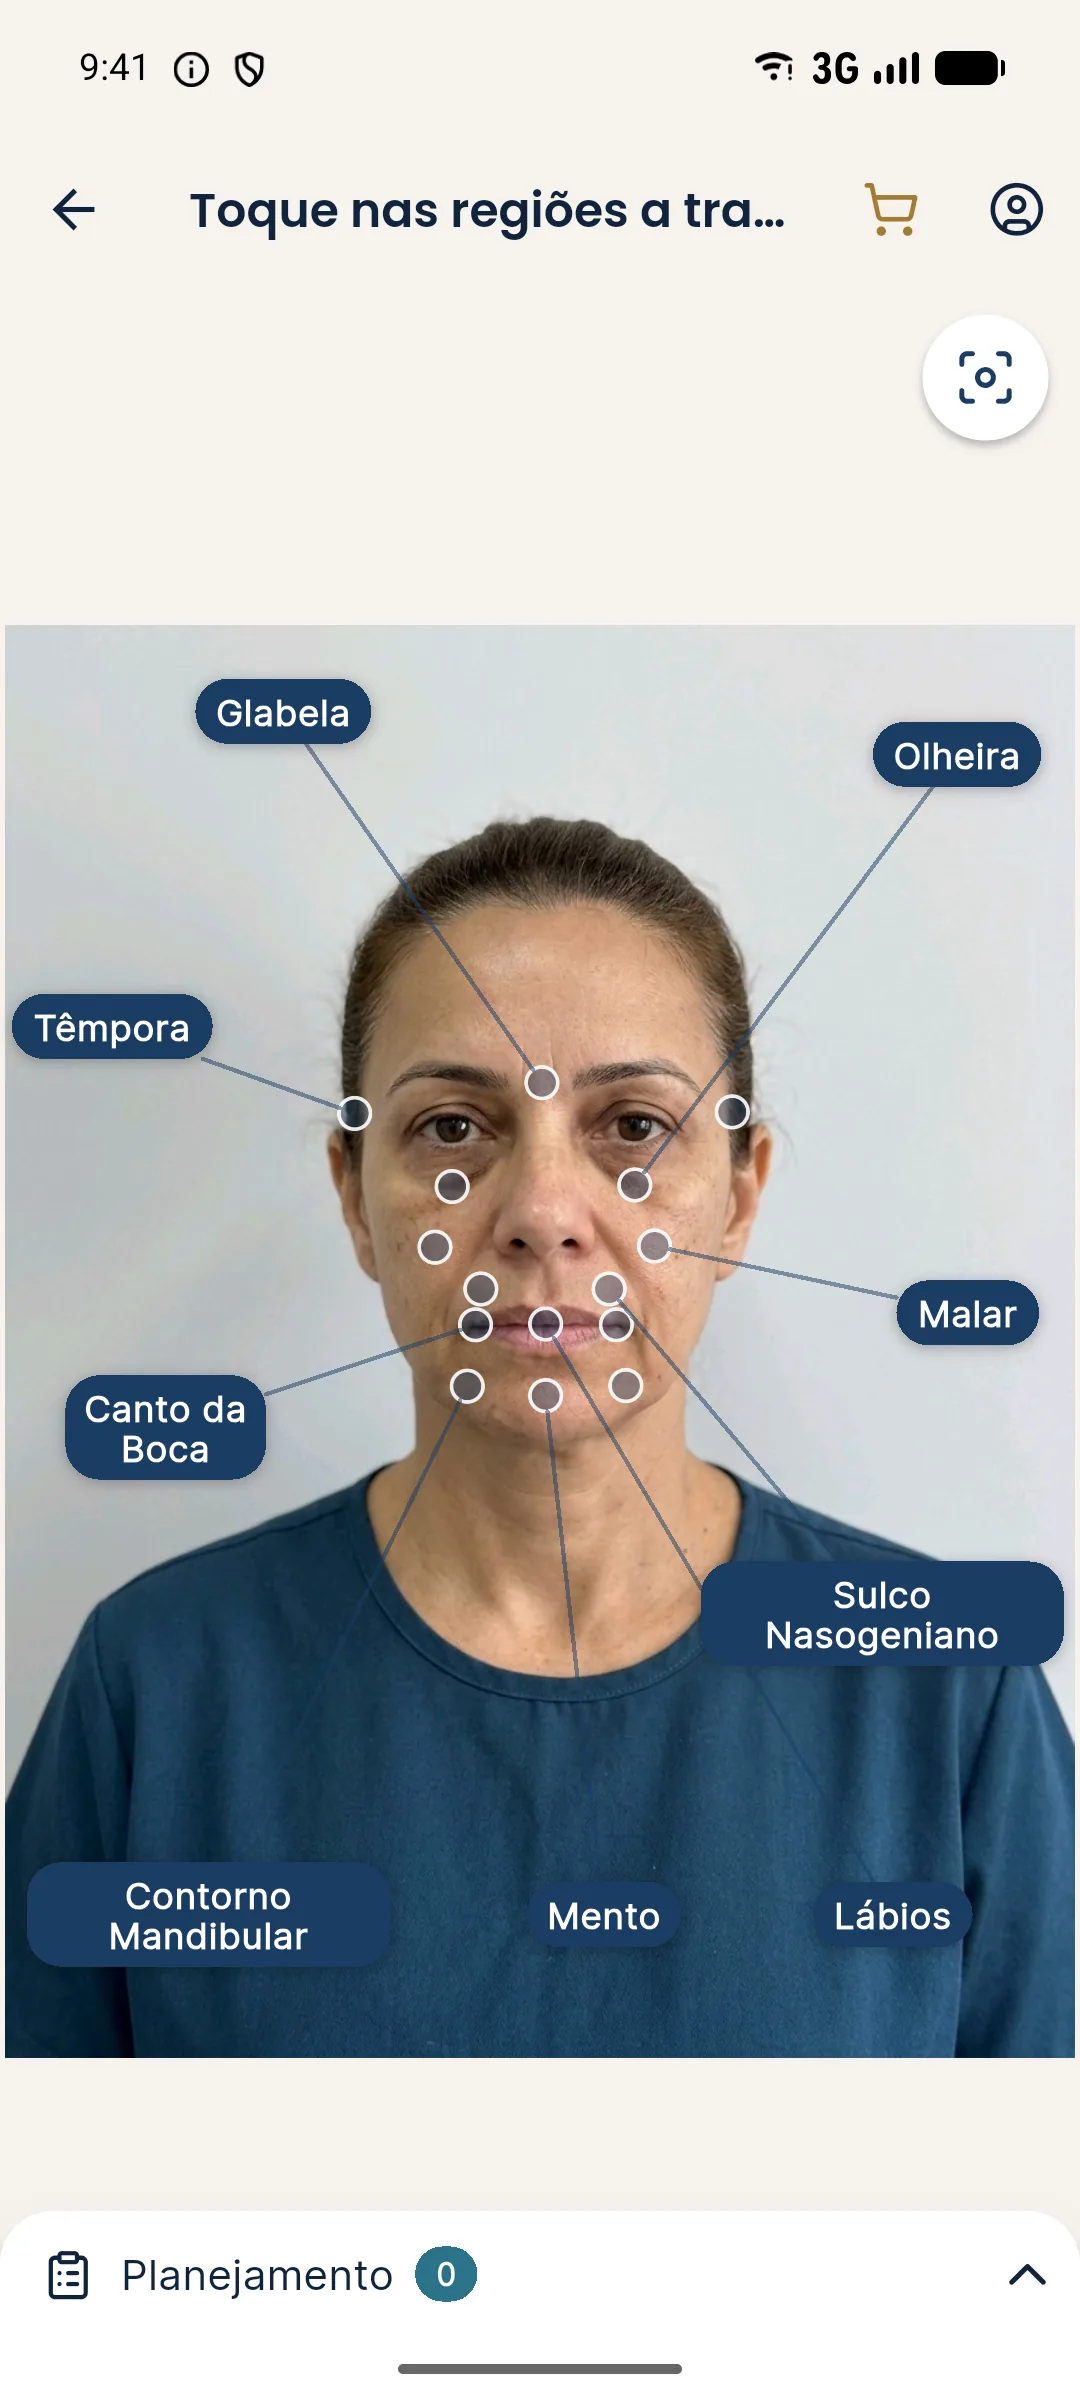
The projection is illustrative, and the changes are subtle. It does not replace the analysis: it serves to let the patient visualize the idea of the plan, after you have done the assessment. It is an illustrative simulation, not a promise of results.
What ethical and privacy care does the photo require?
The patient's photo is sensitive personal data. Before photographing, explain the purpose and obtain the proper authorization: recording in the chart is one thing, and any kind of publication is another. Store it with access control, avoid an unprotected personal phone and do not send it through insecure channels. In Brazil, this falls under the LGPD (General Data Protection Law).
See consent and LGPD for photos, asking the patient for image authorization and LGPD consent for the patient's photo.
How do you record the analysis in the chart?
Write down what you observed in the photo in objective, neutral language, separating observation from indication. For example, "slight asymmetry in the eye line" is an observation; "filler indicated" is a decision that depends on the in-person exam and on the conversation with the patient. Keep the photo with the date, the patient's identification and the capture conditions (distance, light, expression) for future comparisons. See charting and documentation in HOF.
Frequently asked questions
Can you do a facial assessment from a photo alone?
A photo is a great support, but it does not replace an in-person exam. It shows proportions and symmetry at one moment and from one angle, and it loses dynamics, texture, palpation and clinical history. Use the photo as a complement to the assessment.
What should you look for in a frontal photo during a harmonization assessment?
Overall symmetry, proportion between the thirds of the face, the line of the eyes and mouth, projection of the cheekbone and chin, the jawline, and the relationship between the lips and the folds. Always with the caveat that the photo is two-dimensional.
How do you standardize the photo for analysis?
Always use the same distance, diffuse light, a neutral background, an aligned head and a relaxed expression. Standardization lets you compare before and after and reduces reading errors.
Can the photo be misleading in an assessment?
Yes. Lens, distance, angle, light and expression change the proportions that seem to exist. That is why photo analysis should be confirmed at the in-person exam before any decision.